3D Miniature Card |
Birthday cards are "famous" for being thrown away immediately or not considered at all. This is the reason why I wanted to create a card that would amaze the person who receives it. They key is making it special. And this card will be very special for whoever sees it and very simple for you to create. Go and get some cardstock and paper, and make this extra gift to go with the main present. It will be greatly appreciated! |
Materials and Tools:
- black (or different color) cardstock
- colored quilling paper strips or colored paper to create your own strips (find out how to make them here)
- slotted quilling tool
- white glue
- scotch tape
- cotton thread - I used a pink one
- cutter or scissors
- ruler
Step 1
Step 1
Roll a beige strip of paper using the quilling tool and release it between your fingers to create a loose coil. Secure it with glue.
Now you need to create other 2 smaller loose coils, one small than the other. This means that you have to release them less than the previous one, but they still need to be loose. For this reason, make sure that the first coil isn't too small otherwise the smaller coils will be too tight.
Now that you have 3 loose coils, press each of them with your fingers to make them D shaped.
Take the biggest one and glue the middle one of it making sure that their straight sides meet each other. Finally, glue the smallest coil on top, always keeping the straight side where the others are. This is very important because you'll be able to stick this miniature cake to the cardboard this way.
Step 1

Step 2
Step 2Insert a white strip of paper in the quilling tool and create a very tiny tight coil. It must be so tiny that you only need a round or 2.
Make 2 tight coils like this, always securing them with glue. Glue both on top of the cake. Now create 2 small loose coils (3/4 rounds) with an orange strip and press both of them with your fingers to give them a teardrop shape. Glue their round side on the tip of the 2 tiny coils you attached previously. 
Step 2
|
Step 3
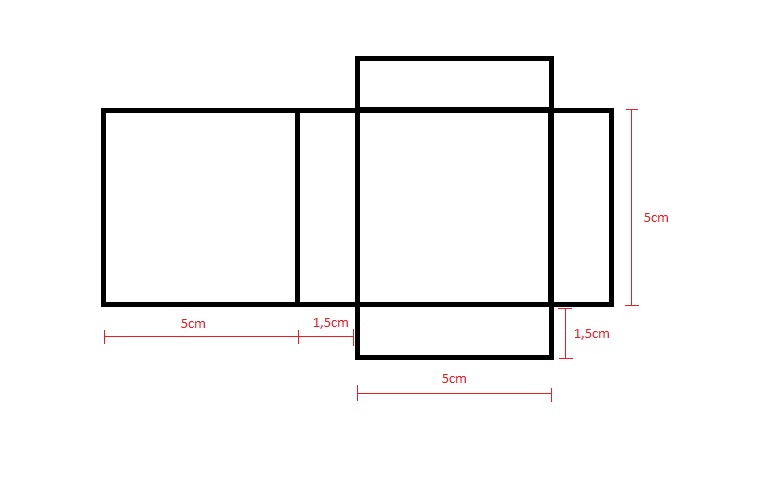
Step 3Draw the structure you see in the picture above on a piece of black cardstock and cut it. This is the box structure. It's composed of 2 squares with a 5cm side (1.96 inches) and 4 rectangles around that are 1,5cm thick (0.59 inches).
Fold the square that doesn't have anything around following the line you traced. 
Step 3
|

Step 4
Step 4
Now it's time to write the name of the recipient. I wrote Mia so I will explain how I made it. You can write whatever name you want of course, in whatever way you want.
So, insert a pink strip in the quilling tool and make a few rounds. Remove it from the tool and release it a little between your fingers to make a loose coil but don't glue it this time. Keep about 1cm (0.39 inches) of free paper after the coil then fold the strip down. Leave some free strip again and fold up then down again, to create the shape of an "M". Now leave some cm of free paper and cut it. Insert the other end of the strip in the tool and roll it a little to complete the other side of the "M".
Glue the letter on the cardstock square you folded.
Now cut about 1cm (0.39 inches) of pink strip and give it around shape to create an "I". Glue it next to the M on the cardstock. Create a tiny tight coil to make the dot of "I".
Finally, make a new loose coil for the "A". Glue it but don't cut the strip! Leave a free piece after the coil and cut it. Glue it next to the "I".

Step 4
Step 5
|
Fold the black cardstock following the structure lines you traced to create a little box.
Keep the box in shape adding little pieces of scotch tape on the inside of the box. You can also glue a white strip of paper all around the thin sides of the box to keep it even more steady. Finally, glue the miniature cake inside the box, right at the bottom as if it is standing, and write a note above it. |
Step 5
|

Step 6
Step 6Make a little hole in the middle of the right side of the box's cover and another hole on the right box's side, always in the middle. You can use a needle to make the hole or whatever you want.
Insert a pink cotton thread in both holes and close the box making a bow with the lace. 
Step 6
|
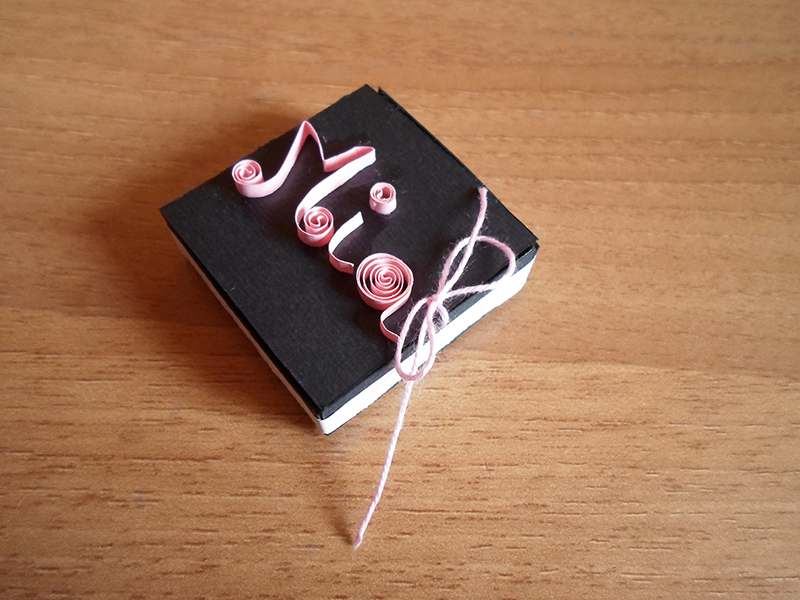
The miniature card is done and ready to surprise whoever will receive it! |
