Make an Armchair out of a...Coffee Table!
|
|
Everything can be reused and this project is the proof. I had an old coffee table that stayed in the basement for a very long time. Everybody thought it was time to throw it away, but the more I looked at it, the more I convinced myself that I could transform that small table into an armchair. I already imagined the whole project on my mind, and even though I knew it was going to be the hardest one I had ever done, I got so excited that I couldn't wait to begin. Here is the result. I'm going to show you how I made mine. You can adjust it to your own kind of table or whatever you intend to use. |
Materials and Tools:
|
|

Step 1
|
Step 1My coffee table has a second level near the bottom, it's like a mini table below the table. I removed it to be able to work on it better.
Paint that level and the legs of the table with wood primer and let it dry. |
Step 1
|
 Step 2 Step 2
Step 2
Rub the surface using steel wool to make it smoother. When you are done, paint with varnish. I used a beige one. You may need to pass more than one layer to perfectly cover the wood. Remember to let the varnish dry between a layer and the other. |

Step 2
|
Step 3
Step 3When the varnish on the table is finally dry, lay it upside down on a big piece of upholstery foam and trace its outline on it, making sure to draw it about 1cm (0.39 inches) bigger than the table.
Cut the shape using a foam cutter or whatever you feel more comfortable using. I don't recommend using scissors though, the cut won't turn out accurate. 
Step 3
|
Step 4You must secure the foam to the table before covering the seat. To do this, spread some glue on the table, place the foam on it and let it dry completely (at least all night long).
I had to use white glue for this because I didn't have the proper glue, but use the specific glue for foam if you can. 
Step 4
|

Step 5
|
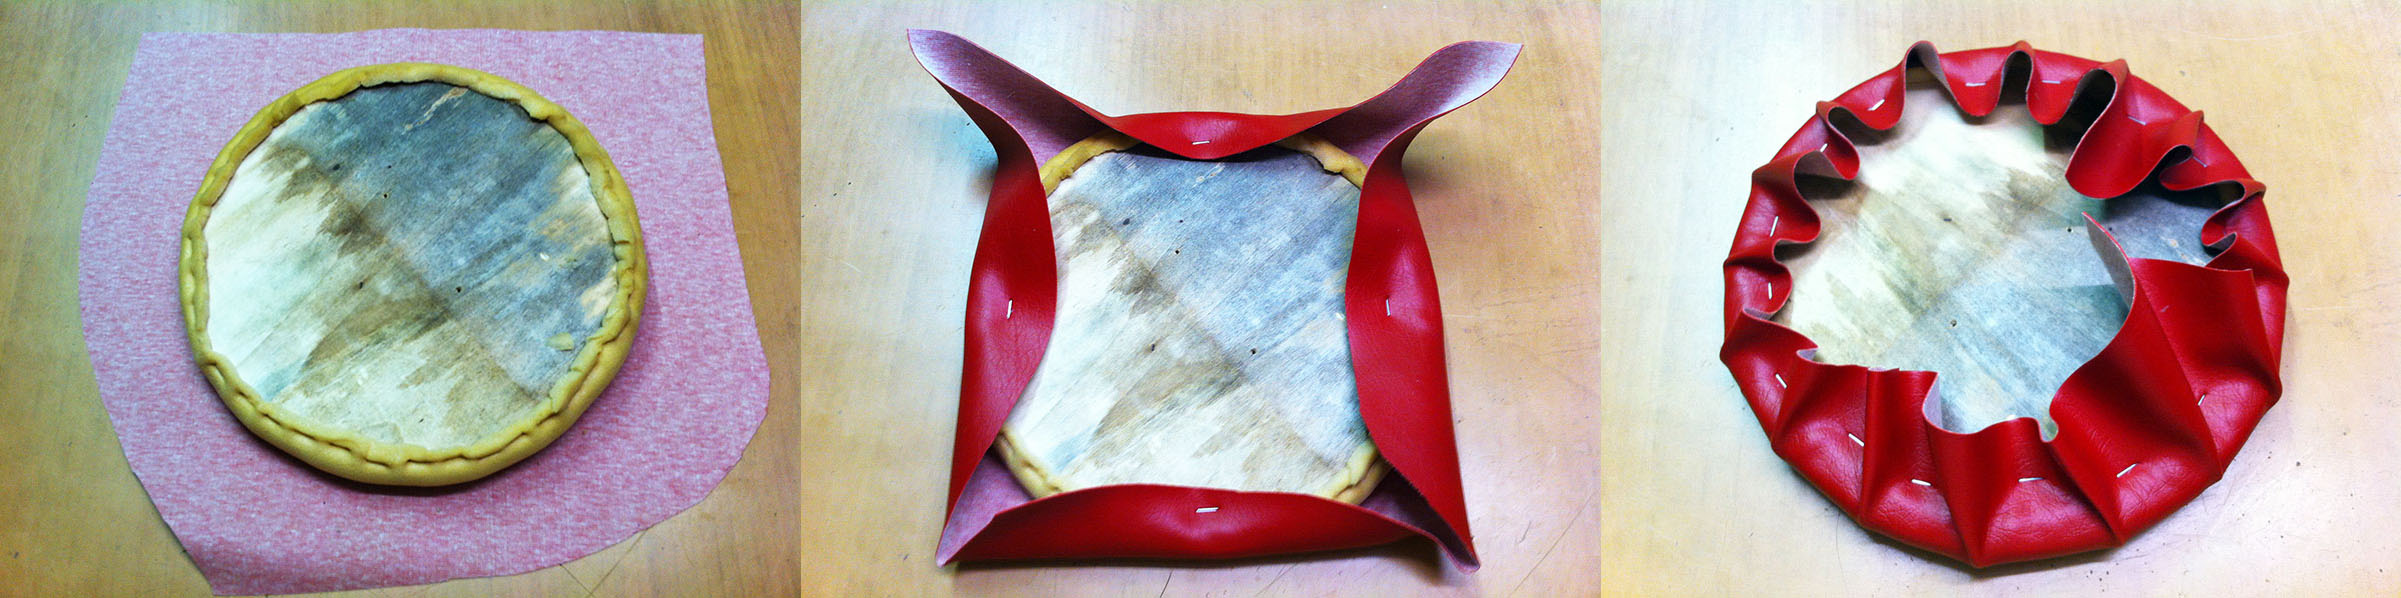
Cut a big piece of artificial leather. It must be bigger than the seat.
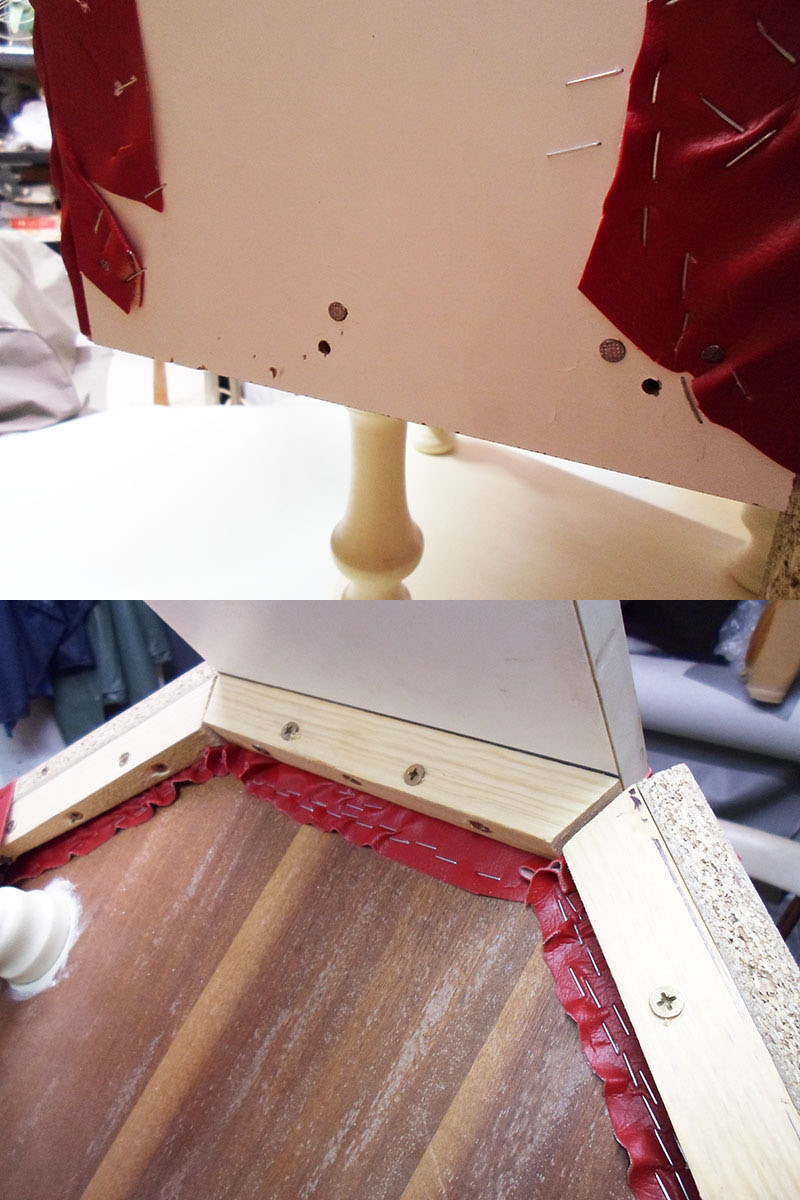
Lay it upside down on a surface and place the coffee table on it, with the foam facing the leather. Start to fold the leather all around, stapling it on the back of the table with a stapler on each side. It's very important to keep the leather tight, so pull it with your hand while you staple it on the wood. Don't pull it TOO much because artificial leather easily breaks! You can start with a few staples on each side, then staple more and more to make sure that all the spots are secured. |

Step 5
|
Step 6
Step 6All the sides are stapled, but the angles are still free.
Most of those angles will be hidden later so it's not important the way you staple them. The most important ones are the 2 front ones. I decided that the front side of my coffee table/seat would be the one with the leg in the middle of a side, this way the chair will be steady. So, considering your front side, pull the 2 angles' leather from the adjacent sides and staple them. Finally, fold the left fabric at the front and staple it too. Look at the photos to understand exactly the way I did it. Keep stapling the other angles the way you prefer (they will be hidden), and cut the exceeding leather. 
Step 6
|
Step 7
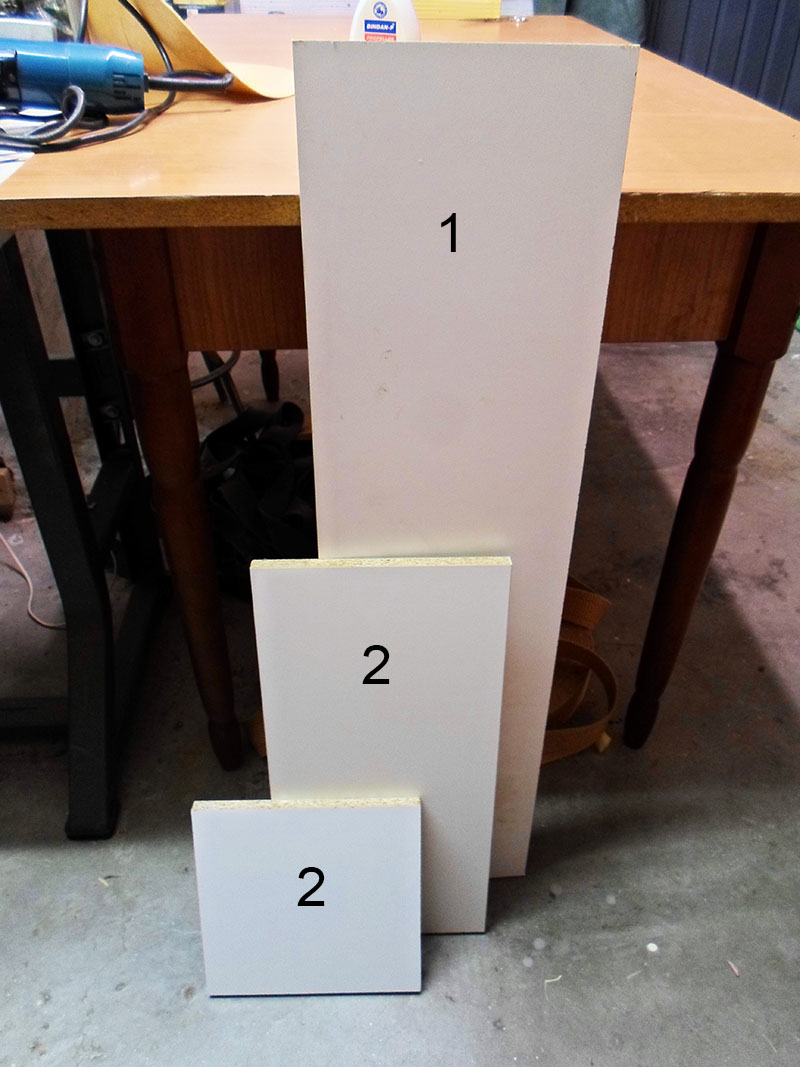
Step 7You need 3 pieces of wood for the back of the chair and 2 for the arms.
Since my coffee table has 3 legs only, I decided that the central piece of the back will be long enough to touch the floor and become the fourth leg. For this reason I made 2 of the back pieces 44cm (17.32 inches) tall and the central is that same size PLUS the measure to reach the floor. The arms must be shorter, so I made them 24cm tall (9.44 inches). Their width must be as long as the sides of the table/seat. |
Step 8
Step 8You need to cut pieces of upholstery foam for the back and arms:
the 3 back foam pieces must be as large as the wood pieces and 41cm long (16.14 inches). The 2 arm pieces must be as large as the wood pieces and 21cm long (8.26 inches). Remember: it's always better if you make the foam pieces a little bigger than how they should be. Now spread the glue on one side of the wood pieces and lay the foam rectangles on each of them, keeping about 1cm (0.39 inches) of foam free on three sides. You'll notice that 4cm (1.57 inches) of wood will remain free from the foam on all pieces. And of course, much more than 4cm will be free on the longest piece of wood. It's important that you leave them free. Staple the top of the foam to the top of the wood, pulling it a little. 
Step 8
|
Step 9
Cut 5 strips of wood. They need to be as long as the sides of the table and about 2cm (2.78 inches) wide. These pieces will keep the back and arms fixed to the seat.
Cut their edges like a triangle so that they can easily face each other. Make 3 holes on each of them and, using screws, place those pieces at the bottom of the arms and the shortest back pieces. For the long one, attach the piece 4cm (1.57 inches) distant from the end of the foam. 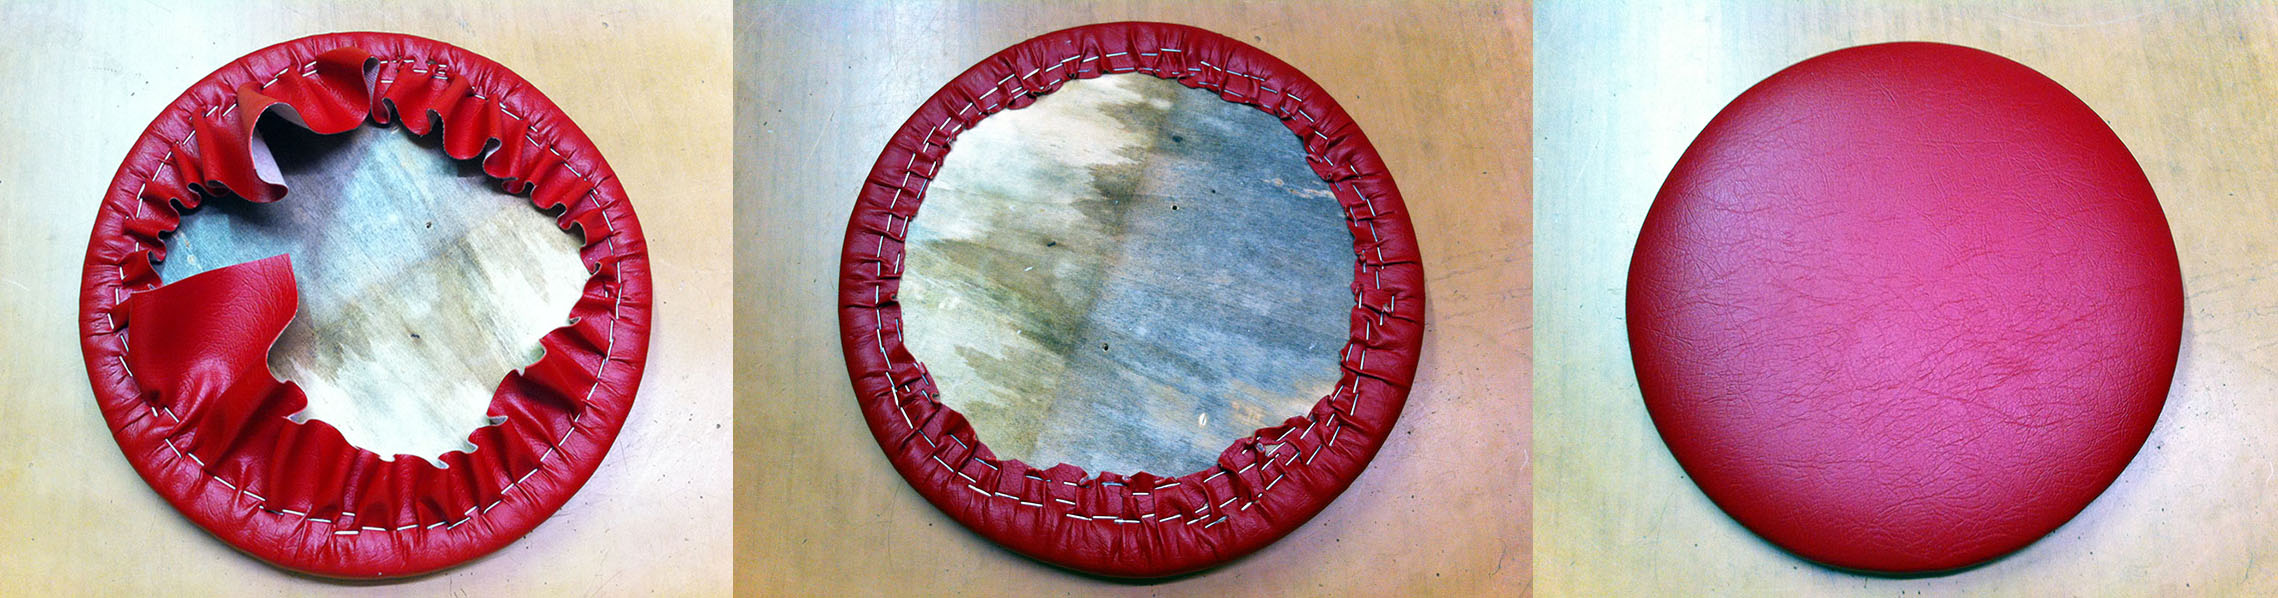
Step 9
|
Step 10
Step 10
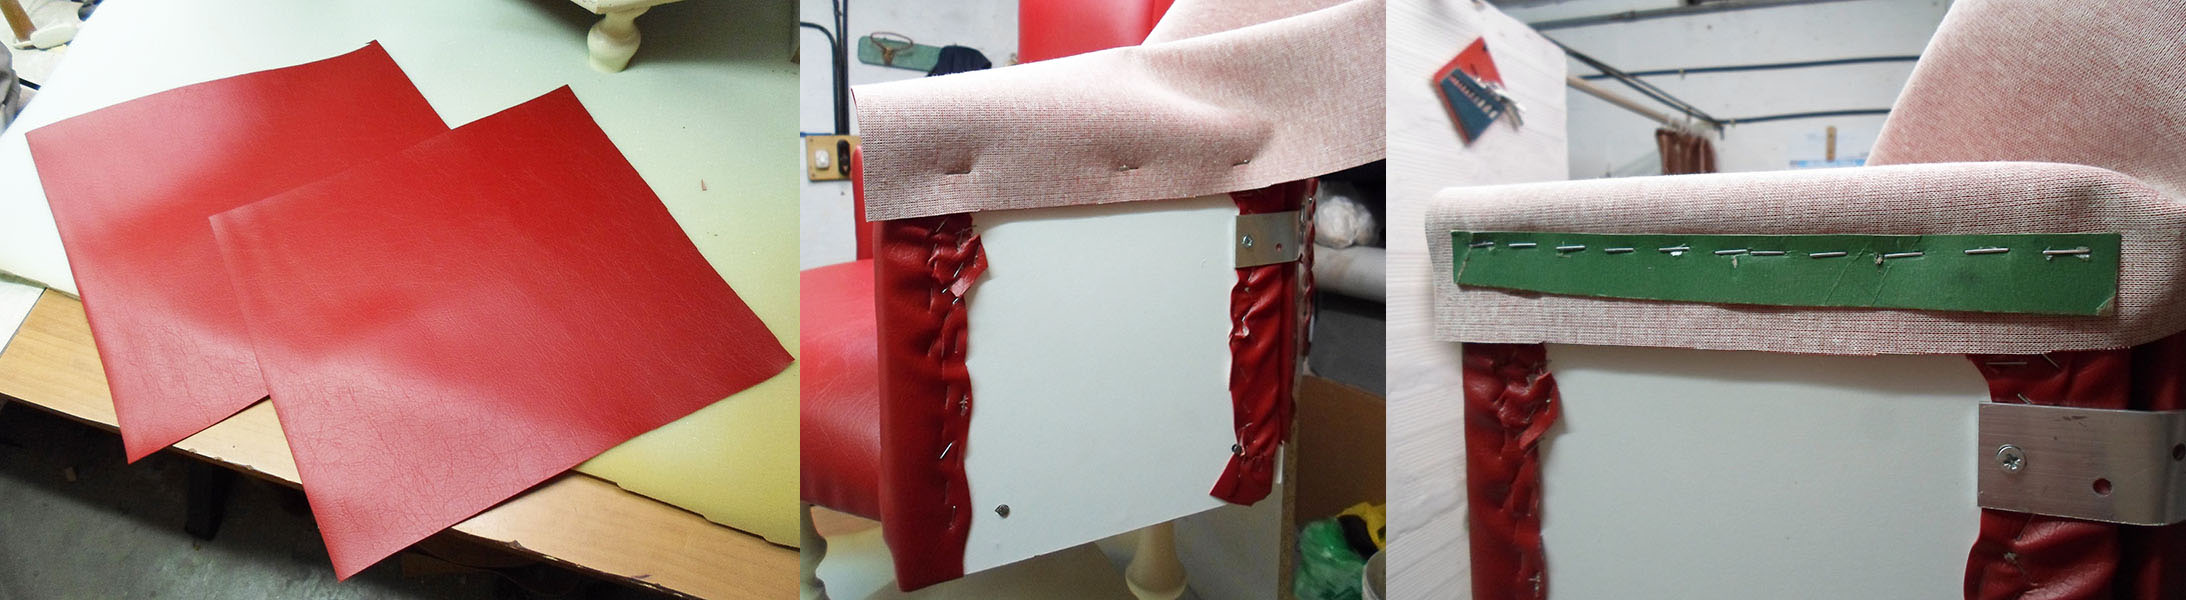
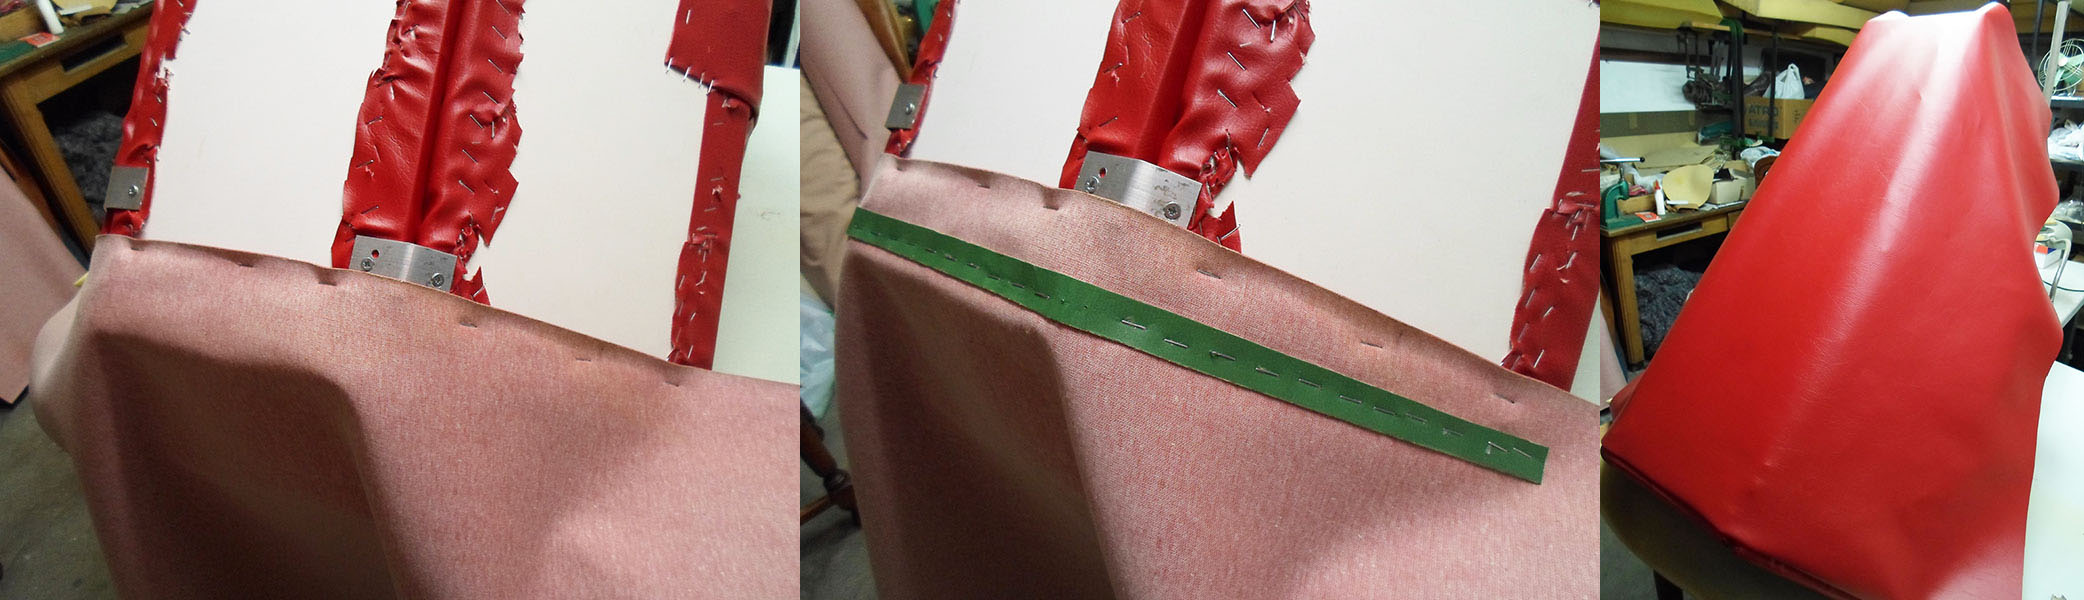
Cut a piece of artificial leather that is big enough to cover one of the back pieces.
Lay it upside down on a table and place the back piece on it with the foam facing the fabric.
Start to fold the leather on the back of the piece (where the wood is) and staple all around it, always pulling the fabric a little, just like you did for the seat. The bottom part must be stapled on the front instead, but don't worry about it because that part will be hidden.
Do the same for all the other back pieces and arms.
I decided to cover the bottom angles of the arms too because those will be visible at the front.
Step 10
Step 11
|
|
Step 11
|
Step 12
Step 12To cover the back of the arms you need 2 pieces of artificial leather. They must be big enough to cover them, so, better bigger than too small.
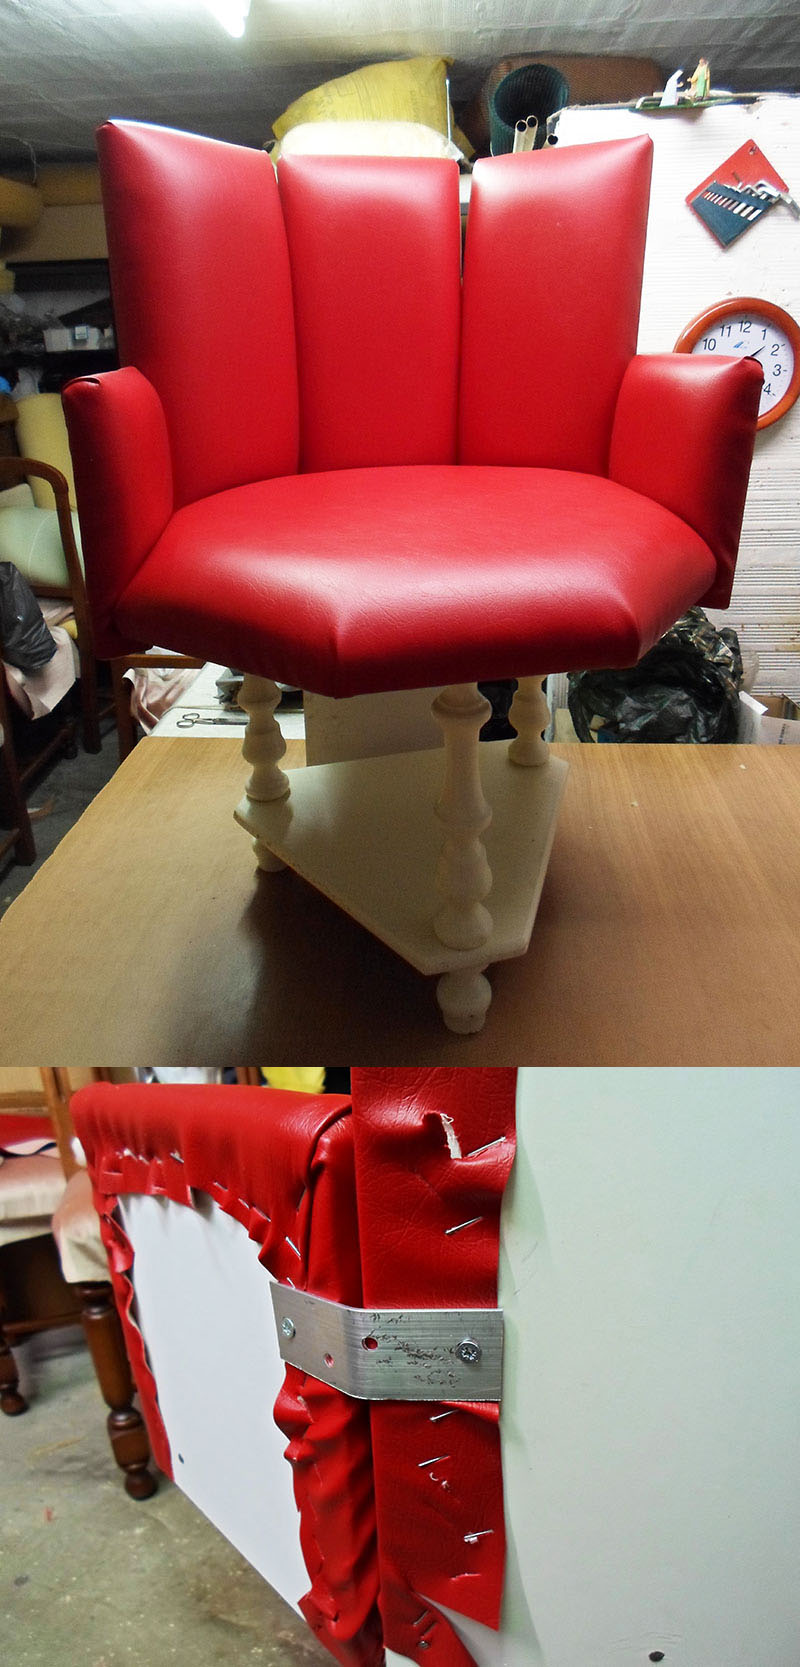
Staple the bottom of the leather on the top of the arm, with the fabric's front facing the wood. Now cut a strip of cardboard as long as the arm's width, and staple it at the top of the arm (where you attached the new piece of leather). Fold down the fabric and staple its bottom below the piece of wood to hide it. Finally, staple the side that meets the back of the chair directly on that back piece (it will be covered). Staple the other side near the edge, trying to be as accurate as possible. You'll hide those staples later. Do the same to cover the other arm. 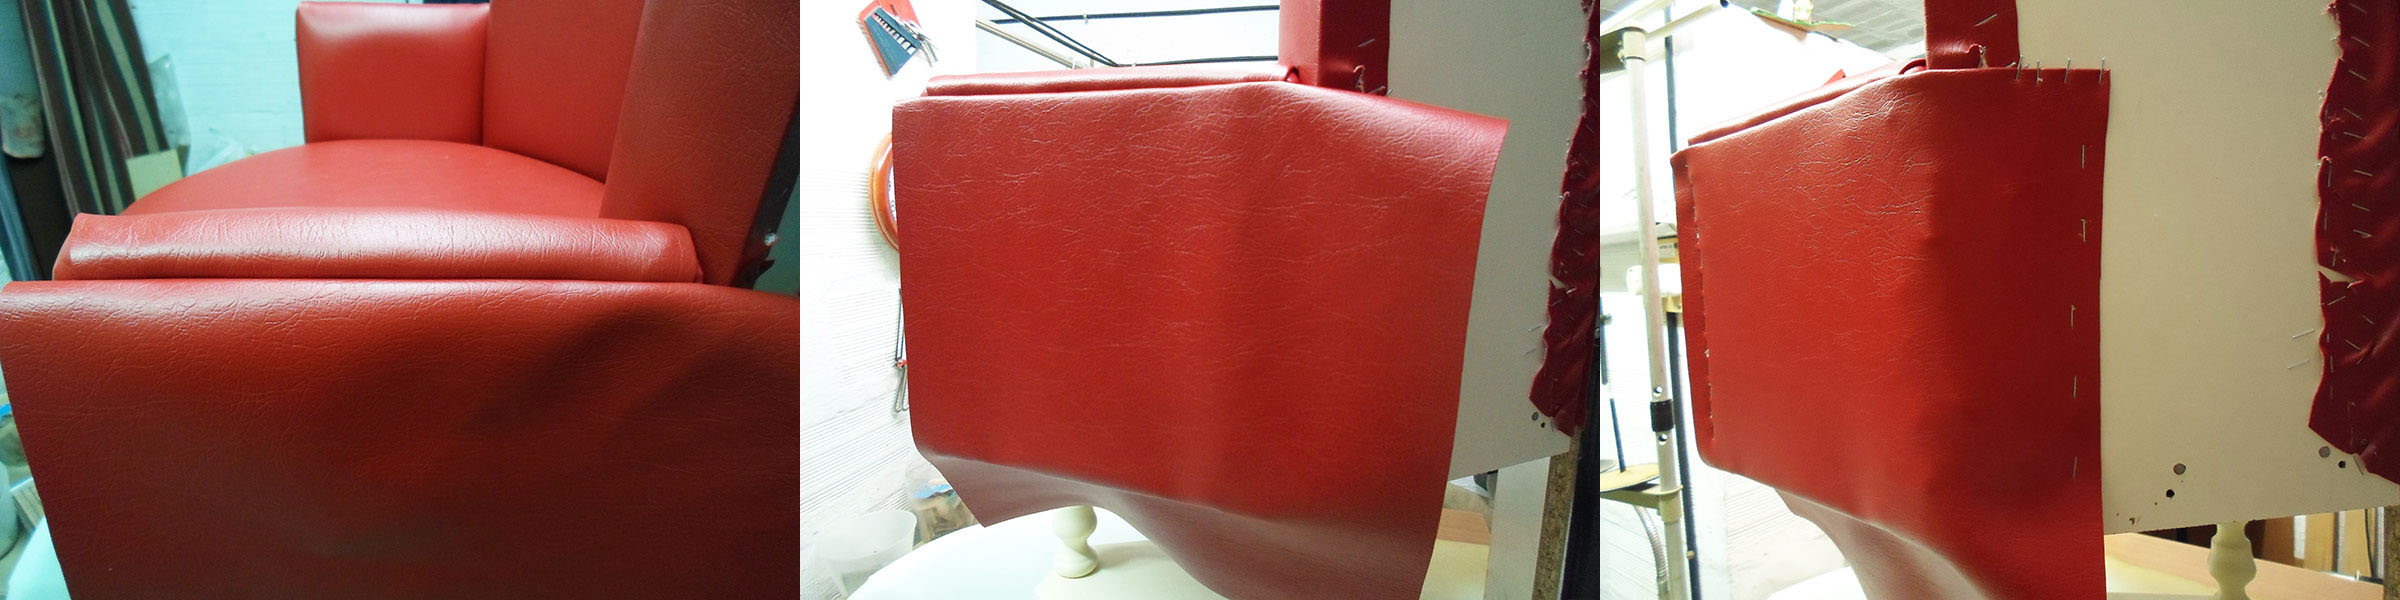
Step 12
|
Step 13
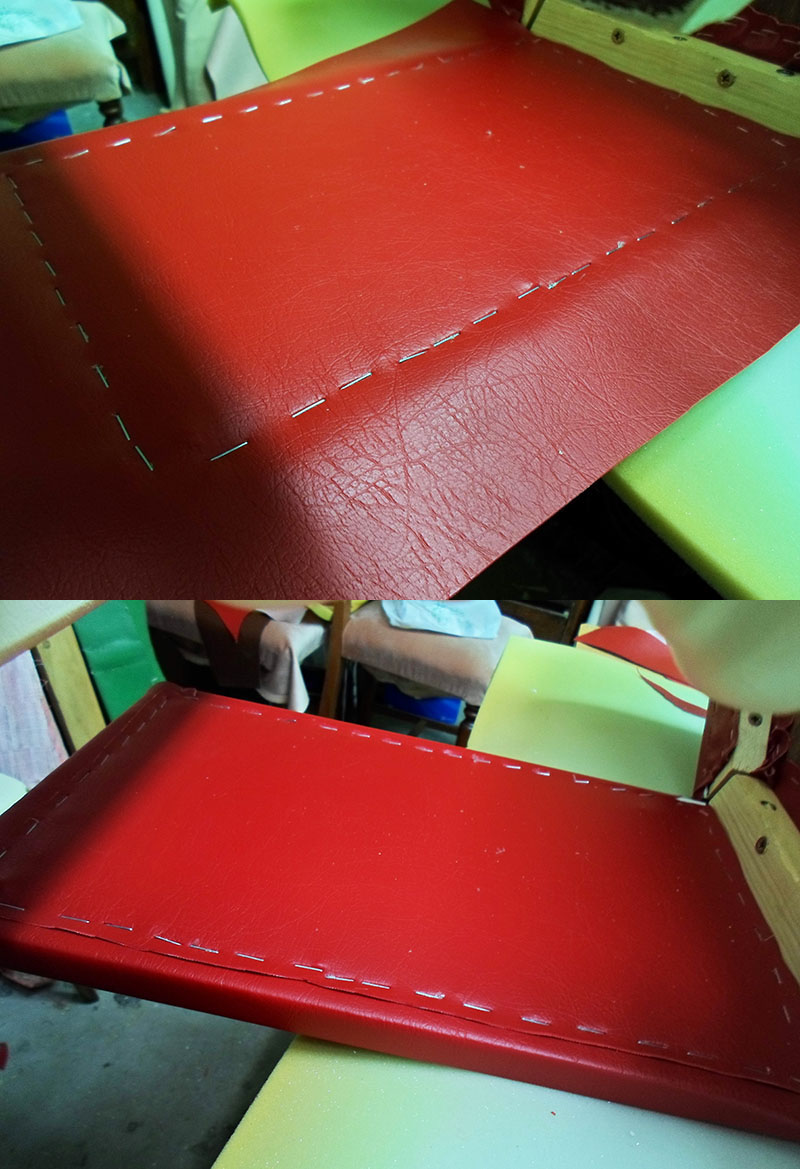
Step 13To cover the whole back of the chair you need to cut a very big piece of artificial leather. It must be VERY big to cover it all at once, and I recommend to make it even bigger because some exceeding parts will be folded.
First of all turn your chair upside down to be able to work better. Staple one side of the leather on the top edge of the chair back (which is the below now). You must work on the back of the fabric now, just like you did to cover the arms. Cut a long strip of cardboard, as long as the back's width, and staple it on that same edge where you attached the leather. Fold the fabric up and cut out the exceeding parts around the back leg, always keeping some leather free on the sides. Staple all those exceeding parts all around the back's back, where they won't be visible. You can see how I did in the photos. For the left and right sides, you can't staple it in the back's back of course because it would be the front of the chair, so staple the sides right on the edges, being very accurate. Those staples will be covered later. 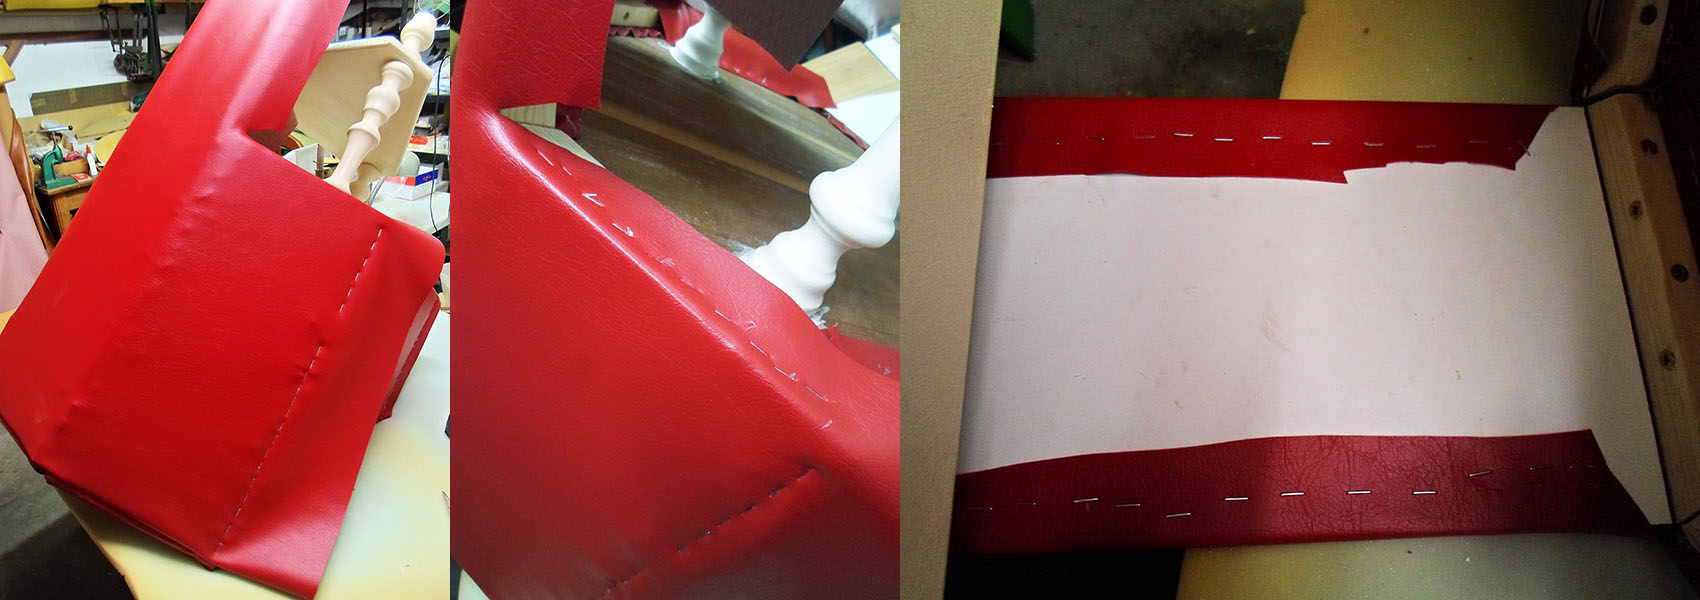
Step 13
|
Step 14
|
Step 14The back of the leg is still not covered and it's visible so you need to cover that part too.
Cut a rectangle out of leather that is bigger than the piece that you have to cover and lay it on the wood. Staple all around the edges, trying to be as accurate as possible. The staples will be covered in the next step. Cut the exceeding fabric on the sides. |
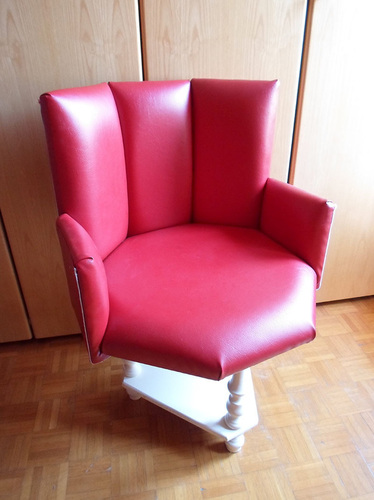
Step 15Cover all the visible staples in the back of the chair with trimmings. I chose a white and red one that would match the color of my chair.
Use hot glue to attach the trimmings all around the edges. 
Step 15
|
|
Everything has been completely covered, the last touches have been done... Your armchair is ready! |
|
